Monday, 4 January 2016

A blog redesign in under 3 hours

We've been using the Christmas break to deal with a backlog of beekeeping duties the biggest and most complicated of which is extracting honey from our mature hives. At just over twenty hives spread around Christchurch and Canterbury, we're still classed as hobbyist beekeepers and sell only a limited amount of honey each year beyond what is consumed by family and close friends.

In truth our beekeeping activities are less about commercial intent than contributing to sustainability and New Zealand's ecology and horticulture. With the goal in mind of raising awareness about bees - and maybe encouraging others to take up urban hobbyist beekeeping - we've been sporadically keeping a blog for a couple of years.

Having designed new labels for this year's honey harvest, I decided yesterday that a redesign of the website was also in order.

Unlike the days of my youth when interest websites were often hand-coded, these days Wordpress, Blogger and other journal websites make it so easy to create and publish content. It's All About Bees is actually a Blogger hosted site. And deciding to refresh to a responsive template, ad ready with a dynamic features and a clean minimalist design is as easy as browsing the options on various template marketplaces.

Having decided to use a new design around 3PM, I settled down for some blog administration at 8:30PM. Paying $6.95 USD for the Sinesis blogger template that I liked from the options available on Sora Templates using Paypal, uploading the new template, customising settings and re-coding a few display and layout styles that I wanted to tweak was done by 10PM. I edited and re-tagged some of the existing content to make the posts look good in the new design and I was all done and dusted by 11PM. Easy!

If you're a technically confident person you can carry out most of what I did with guidance from the help and installation guide that comes with the template. Tweaking the design requires at least knowledge of eXtensible Markup Language (XML) and cascading stylesheets (CSS) and is certainly a more advanced skill. On a couple of my more complex e-zine blogs (this one and The Style File) I've also tweaked some of the behaviours which meant dusting off my Javascripting skills - but that's not really required and paying for a template does give you technical support for more complicated things.

Although I paid for the premium template to remove the footer credits and to ensure I get any updates, you can get most Blogger templates for free which means professional looking online journals are only a few clicks away.

It's all about bees

Labels: , , , ,

Sunday, 3 May 2015

Let's replay

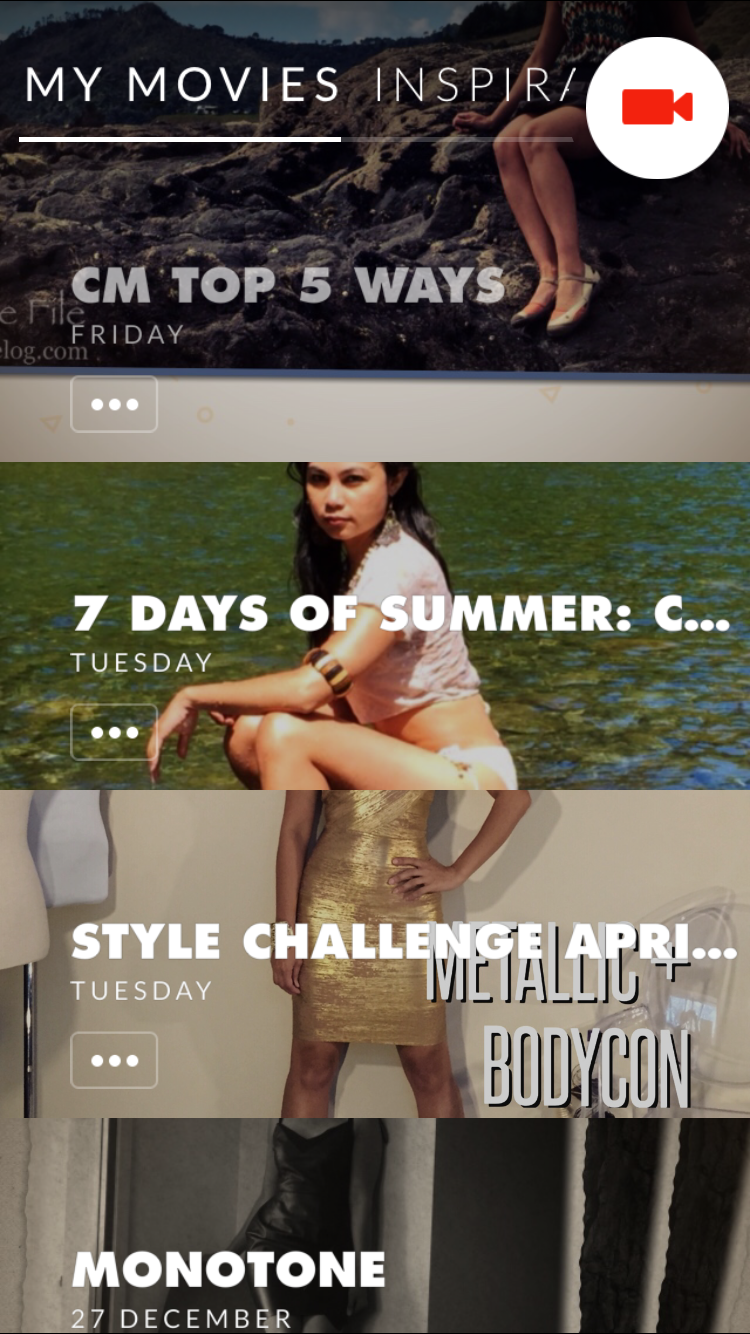
One of my other blogs is a style and lifestyle blog. Given the subject matter there are literally thousands of photos. For the most part these feature on Instagram and most don't warrant a post of their own. However, there are times I like to demonstrate how a single item is used in multiple outfits and other times to pick a theme, such as monochrome, and feature similar looks.

Until recently I've used picstitches as static images to do this but there's something nice about having a richer, dymanic experience.

I actually tracked down a video slideshow app in order to make a digital card for Christmas but saw the potential for more than my personal use when the result turned out so nicely.

There are plenty of options for converting a stack of photos and videos easily and quickly into a slideshow video but I wanted something which had nice transition effects and not just typical, Powerpoint-esque fades and wipes.

Initially I tried Animoto but the inability to download the video without having a paid subscription, and in fact having to upload my photos to a website, didn't suit. I was therefore very pleased, after trying a large number of app options, to find Replay.

Available free for iOS with watermark and in-app purchases for premium themes, it was easy enough to try. Very pleased with the quality of resulting product, I paid $12.99NZD to get all eight additional themes and remove the watermark.

What I enjoy about Replay is the simple interface which allows me to add title slides as well as overlay text on photos. There are over twenty themes each with variations. You can select music from the app library or use your own. It offers a cinematic widescreen format or square for Instagram and three transition speeds.

Whilst my use is quite specific, I do recommend this approach, regardless of app if you're someone who works with a lot of images. My day job exposes me to academic staff, for example, many of whom could benefit from converting old slides into a video for playing at lectures, or uploading to YouTube or a learning management system. It's also handy for sharing your favourite photos, whether from an event or holiday or the embarrassing collage of baby pics for someone's birthday.
Make videos, faster than ever - Replay App
A caveat on Replay: my newest and therefore most powerful iOS device is my iPhone 6. I find that videos with a large number of high resolution photos can only be rendered successfully on this device. My iPad 3 and iPad Mini are both too under-powered to get the job done.


Labels: , , ,

Saturday, 10 August 2013

Get your social media on... optimising Instagram

I expect that you or your web developer spend time every month reviewing your website performance, likely using Google Analytics. And, if you've a fanbase of over thirty people, you're hopefully checking how Facebook is spreading the word through Insights (with new, better, brighter features too). And if you're not - get to it!

But how to optimise the use of your Instagram posts? I've previously taken you through Statigram's website feed service and Facebook tab app. But as the name suggests, one of the their service offerings is a full analytics view of your Instagram account.


Whether you want to look at community engagement, tags and filters that get the best results, or what time and day your community is most active, this is a useful service. After all, there's little point snapping lots of pics for minimal return.

Labels: , , , ,

Tuesday, 6 August 2013

Get your social media on... Instagram gallery feed

One of my blogs is on style, which means it's quite heavy on photos. Most weeks I'll photograph at least a couple of #ootd (outfit of the day), and a few photos of cool items I've found on various shopping expeditions. Not all of the photos result in a blog entry, but I'd still like to share them on the website without having to spend time and energy re-posting.

This isn't a service Instagram offers but thanks to its well-published and extensive application programming interface (API), a number of other services have sprung up that allow further functionality to use your Instagram feed. Yesterday I wrote a how-to on using Statigram's Facebook app to add the feed to your Facebook page. Today, I'll talk you through how to use Statigram's iframe-based widget to add a gallery feed to your blog or website.

If you run a Wordpress site (I don't) they have an easy extension. For everyone else...


What you need

  • Access to edit the layout components or templates of your website
  • An Instagram account

Instructions

  • Go to iconosquare.com and login with you Instagram credentials.
  • Select 'Promote' from the top menu.
  • Scroll down to 'On your blog & website' and click the 'Get your widget' button in the 'Photo Gallery Widget' box.
  • Configure the display settings and click the 'Get code' button.
  • Copy the iframe code and paste into your website template or page layout component.
Looking to build an effective Instagram strategy?

Labels: , , , , , ,

Monday, 5 August 2013

Get your social media on... Instagram feed on Facebook

So, you've been busy snapping photos to help engage with your customer or fan-base on Instragram. After all that effort for something so fleeting, you want to share the feed without reposting every instagram to your Facebook page and having the crossover group receive multiple notifications. Solution? Add your Instagram feed to your Facebook page. It's quick, relatively painless and is a simple as a step-by-step wizard.

And, if you're conversing on Instagram using a special #hashtag, such as #gadgetgirlfiles, you can even add a feed for that #hashtag and share other people's related 'grams.

It all starts by going to https://apps.facebook.com/instagram_feed. First you'll be asked to log into your Facebook account, one with management rights over the Facebook page you want to add the feed to. After selecting the page you want to manage, you repeat the login but this time for your Instagram account. Give permission for the two accounts to play together and that's it.

There are further settings, such ordering the #hashtag feeds and imposing moderation once you've added the app to your Facebook page.


Labels: , , , , , ,

Wednesday, 24 July 2013

Get your social media on... Google+ badge

The next in our social media series is on how to add a Google+ badge as featured on this blog. Similar to the Facebook like box, the work is essentially done for you.

What you need

  • Access to edit the layout components or templates of your website
  • A Google+ Page

Instructions

Go to https://developers.google.com/+/web/badge/. Either enter the Google+ URL you want to create the badge for or log in to access all the profiles, pages and communities associated with your Google account. Configure the settings until you get the result you want. Simply follow the instructions to insert the generated code into your website template or content.


Google+ Platform

Labels: , , , , , ,

Tuesday, 23 July 2013

Get your social media on... Facebook like box

For a couple of my blogs, I use social media to promote content and engage with readers. You'll notice that there are links on the header navigation to the Gadget Girl Google+ and Facebook pages, as well as a link to the Twitter account.

The merits of engaging through social media channels isn't the topic today. Instead I wanted to share how simple it can be, using the readily available online tools, to provide links to social media assets from your own website or blog.

Today's how-to is to add a Facebook like box, as featured on this blog.

What you need

  • Access to edit the layout components or templates of your website
  • A Facebook page

Instructions

Go to https://developers.facebook.com/docs/reference/plugins/like-box/ and change the default URL to your Facebook page URL. Configure the settings until you get the result you want and click "Get Code". From there, simply follow the instructions to insert the plug in code into your website template or content. There are a variety of options, from a simple URL call to iframe and HTML5.


Facebook Like Box

Labels: , , , , , ,